Showing posts with label Artistically Inked. Show all posts
Hello - Artistically Inked -GDP412 Case the Designer Challenge

Hello - Artistically Inked -GDP412 Case the Designer Challenge


Hello and welcome back to my blog! Today's card is for Global Design Project's GDP412 CASE the Designer Challenge . This week we are CASEing the amazing Wilma de Korte. I love her clean and simple style and was inspired by her layout, colours and stamp set.

I used the Artistically Inked stamp set (retired), coordinating Artistic Dies, Garden Walk DSP, Vellum Basics Specialty DSP and Iridescent Pastel Gems. I used Stampin' Blends to colour some of the Vellum to add some extra interest.


Instructions:

- Use Calypso Coral for the card base. Layer with the a piece of the Garden Walk DSP and then Basic White card. Use a piece of the Leaf Vellum Basics Specialty DSP and colour some of the leaves with Calypso Coral Stampin' Blends. 

- Use the Artistic Dies to cut a die cut piece using Vellum or DSP. I used a piece of Gold Vellum (retired) and turned it upside down to mute the colour and then adhered to the card.

- Stamp the sentiment from the Artistically Inked set with Calypso Coral ink onto Basic White and add some Iridescent Pastel Gems to complete. 

_____________________________

My SEPTEMBER 2023 Host Code: DPNWQZYH . When you spend over $40 in my store, you will receive a handmade card and a FREE gift from me.

If you would like to purchase any of these supplies, please click here. 

Please email me if you would like a copy of the 2023-2024 Annual Catalogue or the September - December 2023 Mini Catalogue.

Click to JOIN my team. 

Follow me on social media via Facebook, Instagram and Pinterest.

Hope you are getting some crafty time today, chat soon! 
Read more »
Annie A
0 Comments
Thank you so much - Inspired Thoughts & Artistic Dies - Ink and Inspiration Blog Hop October 2021

Thank you so much - Inspired Thoughts & Artistic Dies - Ink and Inspiration Blog Hop October 2021


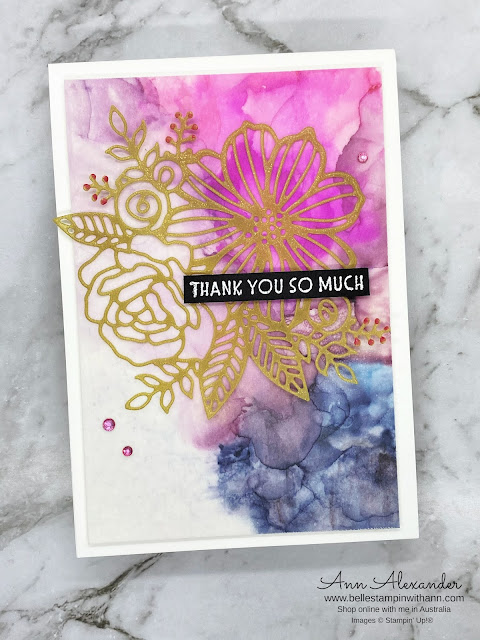
Hello and welcome back to my blog. You are visiting Ann Alexander from Australia. Today I have a card for the "Ink and Inspiration Blog Hop". Our theme this month is "Tool Time". 

I decided to pick Stampin' Blends as my tool. Most people would imagine that you only use Stampin' Blends for colouring images but they can be used in many ways. For my card I created an alcohol ink background using blends and combining them with Isopropyl Alcohol to give the wispy effect. I also used them to add accents to the Vellum and to colour the Rhinestone Jewels.

Additionally I used one of my favourite sentiment sets - the Inspired Thoughts stamp set as well as the Artistic Dies and Gold Shimmer Vellum.


Instructions:

- Use a piece of Basic White card A4/Letter cut in half lengthwise and folded.

- Colour the back of a piece of Vellum with Stampin' blends (see photo for colours) and use Isopropyl Alcohol 100% with an air blower and Water Painter to move the colours around. Apply adhesive sheets to the back and attach to a piece of Basic White card. Attach this to the card base with Stampin' Dimensionals. 

- Die cut the large floral image (from the Artistic Dies set) from Gold Shimmer Vellum. Colour some highlight areas of the vellum with a Dark Polished Pink Stampin' Blend. Attach to the card with Liquid Glue.

- Use a piece of Basic Black card and stamp a sentiment from the Inspired Thoughts stamp set with Versamark and heat emboss with White Stampin' Emboss Powder. Attach to the card with Stampin' Dimensionals. Add some Rhinestone Basic Jewels that have been coloured with a  Dark Polished Pink Stampin' Blend.


Stampin' Blends background created using Isopropyl Alcohol to help move the ink around.


Stampin' Blends used to create the background.

Measurements:

- Basic White Card base A4/Letter cut in half lengthwise and folded

- Vellum/Basic White: A4 5 1/2" x 3 3/4"/ 14.2 x 9.8 cm or Letter 3 7/8" x 5 1/8"

I hope the card you've seen here on my blog today has inspired you to create something today and that you will give using Stampin' Blends in different ways a try.

You are currently visiting Ann Alexander. Please see the list below and hop through all of the people on the list to see all our projects. There is so much inspiration, you won't want to miss any of the other projects! 

Blog Links:


** Email me if you have any questions.

Also don't forget to visit my Tutorial page for my brand new August-September 2021 Sale-a-bration Mega Tutorial Bundle which contains 39 tutorials and Dandy Garden Mega Tutorial Bundle which contains 62 tutorials for Dragonfly and Dandy Garden inspiration from Demonstrators all over the world. I also have my Love You Always - Mosaic Card Tutorial available as a tutorial too.


I am also sharing this card at TGIF Challenges #TGIFC339 Technique Challenge this week using the Alcohol Blending Technique.

Read more »
Annie A
16 Comments
Giving thanks for you - Butterfly Brilliance, A Wish for Everything & Artistically Inked - #JAI570

Giving thanks for you - Butterfly Brilliance, A Wish for Everything & Artistically Inked - #JAI570


Hello again! Today's card is one I have entered into the Just Add Ink #570 Colour Challenge this week.The challenge this week involved using Night of Navy, Coastal Cabana and White. 

For this card I used a few Stampin' Up!® stamp sets. I used the Butterfly Brilliance stamp, A Wish for Everything and the Artistically Inked set. I used the Brilliant Wings Dies and the Suit and Tie Dies.

I also want to thank Just Add Ink for my selection as Winner for last week's "Just Add N" Challenge for THIS card. I am incredibly grateful to the team for my selection. ❤️

Instructions:

- Use a piece of Night of Navy A4 card, cut in half lengthwise and folded. 

- Cut a piece of Watercolour paper and ink up the large Artistically Inked stamp set with Coastal Cabana ink. Spray the stamp with water from a Spritzer prior to stamping, then press down onto the Watercolour paper. Repeat this step with the Coastal Cabana ink until happy with the result. Repeat the same process with the Night of Navy ink. 

- Add some water to the Watercolour paper using both a Spritzer and Water Painter to move the colour around more as well as to add splatter. Splatter some Wink of Stella ink onto the Watercolour card. Once dry, attach this piece to the Night of Navy base with Stampin' Dimensionals. 

- Using a piece of White Vellum card, stamp a large butterfly image from the Brilliant Wings stamp set with Versamark ink and heat emboss with White Stampin' Emboss Powder. Die cut the butterfly using the Brilliant Wings Dies. Attach the butterfly to the card using Mini Glue Dots.

- Use the 'A Wish for Everyone' stamp and stamp the sentiment onto Coastal Cabana card using Versamark ink and heat emboss with White Stampin' Emboss Powder. Use a strip of Night of Navy card and mat under the sentiment strip and attach both to the front of the card using Stampin' Dimensionals. (NB- for this I used a leftover scrap of Night of Navy that had been cut using the Suit and Tie Dies).

- Add some Wink of Stella to the butterfly wings and add some Holiday Rhinestone Basic Jewels to the card.


Don't forget to subscribe to my newsletter as I will have dimensions for this card. 

Also don't forget to visit my Tutorial page for my brand new August-September 2021 Sale-a-bration Mega Tutorial Bundle which contains 39 tutorials and Dandy Garden Mega Tutorial Bundle which contains 62 tutorials for Dragonfly and Dandy Garden inspiration from Demonstrators all over the world. I also have my Love You Always - Mosaic Card Tutorial available as a tutorial too.

Read more »
Annie A
2 Comments
Thanks - Artistically Inked Bundle & Beautifully Penned DSP - Demonstrator Training Program Monthly Blog Hop - August 2021

Thanks - Artistically Inked Bundle & Beautifully Penned DSP - Demonstrator Training Program Monthly Blog Hop - August 2021


My card for today is for Kylie Bertucci's Demonstrator Training Program Blog Hop August 2021. I am so happy that you could join my fellow demonstrators and I today for this blog hop, which I hope will provide you with many ideas and creative inspiration. The theme is "Thank You".

We are a group of Stampin' Up!® Demonstrators from around the world that are taking part in training that is helping us to build a successful Stampin' Up!® business and reach some goals we have set. We really appreciate your support!

You may be starting here or may have come from another blog - either way you can find the link list at the bottom of this post so that you can see every blog post and idea today.

Today I used the Artistically Inked Stamp set and combined it with the Artistic Dies, Expressions in Ink Ephemera Pack, Beautifully Penned DSP (a Sale-a-bration item) and White Vellum.


Instructions:

Use a piece of Smoky Slate for the card base. Use 2 consecutively smaller pieces of the Beautifully Penned DSP and adhere each of them in layers onto the Smoky Slate card with Liquid Glue. Place the layers on the side of the card rather than in the centre.
 
Die cut two leaves using the Artistic Dies from Melon Mambo card and White Vellum. Use a gold piece of the Expressions in Ink Ephemera Pack and adhere to the card using dabs of Liquid Glue. Adhere the leaves to the card using Liquid Glue.

Stamp the sentiment from the Artistically Inked stamp set onto a strip of Basic White card using Tuxedo Black ink. Fussy cut the sentiment and then adhere to a piece of BasicBlack card and then fussy cut again. Adhere to the card with Mini Stampin' Dimensionals. 

Colour the adhesive-backed sequins from the Expressions in Ink Ephemera Pack with Melon Mambo Stampin' Blends and then adhere to the card.


Measurements:

- Smoky Slate card base A4/Letter cut in half and folded.

- Beautifully Penned DSP Layer 1: A4 5 5/8" x 3 7/8"/ 14.4 cm x 10 cm or Letter 4" x 5 1/4"

- Beautifully Penned DSP Layer 2 : A4 5 3/8" x 3 5/8"/ 13.9 cm x 9.5 cm or Letter 3 3/4" x 5"


Thanks so much for stopping by today!

As I mentioned at the top, this is a blog hop so make sure you 'hop' around to all the amazing projects from my fellow demonstrators on this hop! Click on the links below to visit them.

Do you need any of the products used on todays project? Scroll down to the bottom of this post to find the products and click on the shopping links below and add them to your collection now. 

BLOG LINKS:


** Email me if you have any questions, and don't forget to subscribe to my newsletter.

Don't forget to visit my Tutorial page for the Dandy Garden Mega Tutorial Bundle which contains 62 tutorials for Dragonfly and Dandy Garden inspiration from Demonstrators all over the world. I also have my Love You Always - Mosaic Card Tutorial available as a tutorial too.

My AUGUST 2021 Host Code: GJ6RDDW3 . When you spend over $40 in my store, you will receive a handmade card and a FREE gift from me.

If you would like to purchase any of these supplies, please click here. Don't forget that the Beautifully Penned papers are part of the Sale-a-bration catalogue running till the end of September. You can get this set for free for purchases over $90 in the Stampin' Up!® Australian store.

Please email me if you would like a copy of the brand new 2021-2022 Annual Catalogue, or the Aug-Dec 2021 Mini Catalogue & Sale-a-bration catalogue.

Click to JOIN my team. 

-If you would like regular updates from me, click my blog link here, and my newsletter link here.

Follow me on social media via Facebook, Instagram and Pinterest.

Hope you are getting some crafty time today, chat soon! 

Product List
Read more »
Annie A
10 Comments
I am an Independent Stampin' Up! Demonstrator