Showing posts with label Joyful Flurry. Show all posts
Happy Christmas - Joyful Flurry - Use Your Stash December 2025

Happy Christmas - Joyful Flurry - Use Your Stash December 2025


Hello and welcome back to my blog! Today's card is for the 'Use Your Stash" Instagram Hop December 2025. I am joined by an amazing lineup of crafters, so make sure you go to my Instagram page HERE to see the rest of the team's creations. 

The aim of the hop is to use up some of the huge stash that we all accumulate. Hopefully it will also inspire both ourselves and others to combine some of our old and new products to reduce that stash.

This month's theme is "Bring the Bling!". I pulled out a quite a few retired items from my stash for this challenge. I used the Joyful Flurry stamp set with the coordinating Frosted Flurries Dies, Shimmery White cardstock, Gold Fine Shimmer Paper, Gold & Vanilla Glimmer Specialty Paper, Sparkle & Shine Sequins Assortment and Rhinestone Basic Jewels. 


Instructions:

- Use Shimmery White card for the base, layer with a piece of Gold Fine Shimmer Paper and then another piece of Shimmery White card. 

- Die cut snowflakes from Gold & Vanilla Glimmer Specialty Paper using the Frosted Flurries Dies, and layer onto the card. Stamp the sentiment from the Joyful Flurry stamp set onto Shimmery White card using Tuxedo Black ink. Layer the sentiment onto a piece of the Gold Fine Shimmer Paper and adhere.

-  Use the Sparkle & Shine Sequins Assortment and adhere as many as wanted to the front of the card. Add some Rhinestone Basic Jewels to the snowflake centres to complete.


__________________________________________

If you would like to purchase any of these supplies, please click here. 

Follow me on social media via Facebook and Instagram . Hope you are getting some crafty time today, chat soon!
Read more »
Annie A
0 Comments
Artisan Design Team - December 2022 - Joyful Flurry

Artisan Design Team - December 2022 - Joyful Flurry


Hello and welcome to my blog! Today I am sharing my last Stampin' Up!® Artisan project which is part of the December monthly showcase projects for the Stampin' Up!® Artisan Design Team! 

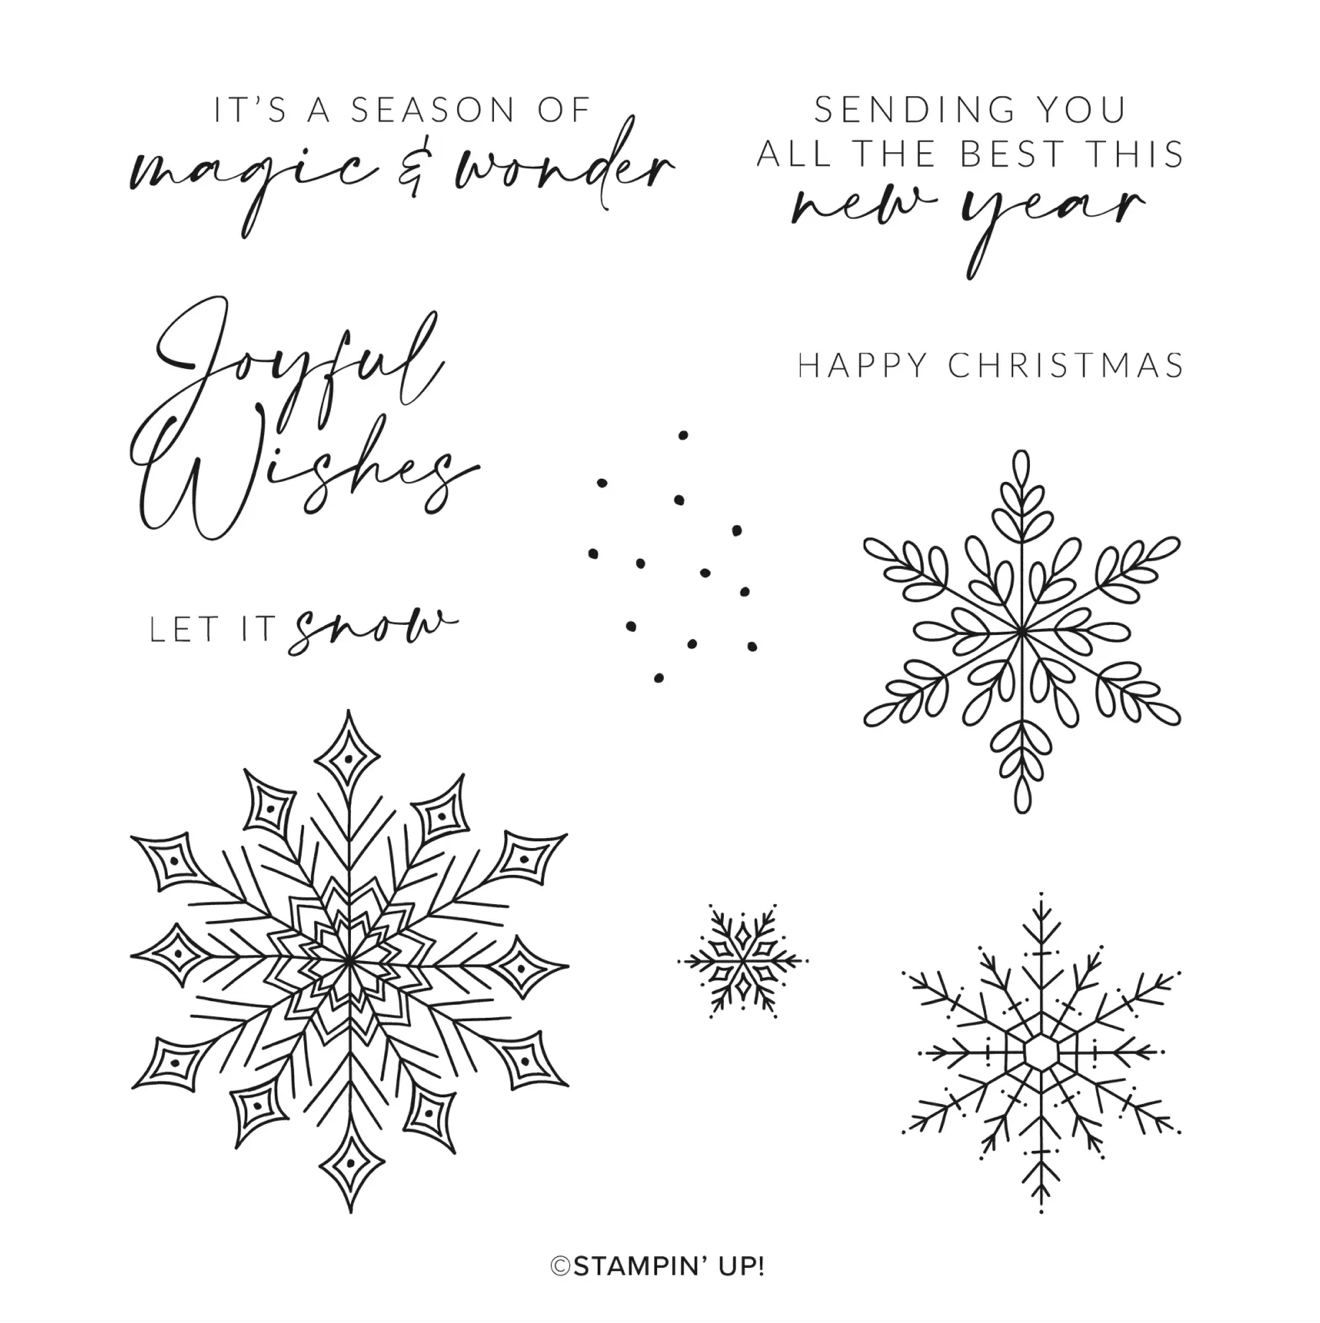
For this month's projects, I was asked to use the Joyful Flurry Bundle which consists of the Joyful Flurry Stamp Set and Frosted Flurry Dies. 

Don't forget to visit the Stampin' Up!® Corporate Facebook Page (here) or the Stampin' Up Official Instagram page (here) to see what the other Artisan Team Members have created with this set. 


Here is the Joyful Flurry Bundle:


Joyful Flurry Stamp Set:


The Frosted Flurry Dies :


Happy Christmas


Instructions: 

- Use Very Vanilla for the base and layer with Polished Pink. Use a piece of Petal Pink and use the various snowflakes from the Frosted Flurries Dies and die cut into the piece of Petal Pink. Stamp snowflakes from the Joyful Flurries stamp set onto this piece with Polished Pink ink. 

- Die cut snowflakes from Gold & Vanilla Glimmer Specialty Paper using the dies and adhere to the snowflakes and the card. Add some Iridescent Rhinestone Basic Jewels to the snowflakes.  Stamp the sentiment from the Joyful Flurry set using Polished Pink onto Very Vanilla and adhere.

TIP: 

- Use your Take Your Pick tool to lift the die cut arms of the snowflakes to show the Polished Pink card underneath. 

Let It Snow


Instructions:

- Use a piece of Very Vanilla and die cut two circles using the Layering Circles Dies. Emboss wit the Snowflake Wintry Embossing Folder. Stamp the snowflakes using Versamark ink and heat emboss with White Stampin' Emboss Powder and die cut the Frosted Flurry Dies. Layer these with snowflakes die cut from Glimmer Specialty Paper with the Frosted Flurry dies.  Add Rhinestone Basic Jewels to the centre of the snowflakes.

- Use the Snowflake Specialty Vellum 2 pieces of  2" x 12", score at 1/4" intervals and accordion fold the pieces and then adhere to each other, flatten the one long piece into a rosette and use glue to adhere to it at the centre. Adhere the snowflake circle on top with the glue. Repeat this process to create the second rosette.

- Stamp the sentiment from the Joyful Flurry using Tuxedo Black onto Very Vanilla. Die cut with one of the label dies from the Frosted Flurry Dies. Adhere to the first snowflake. Use a piece of White Glittered Organdy Ribbon, loop behind one of the rosettes and adhere both the rosettes and snowflake decorations to it to create a hanging Christmas ornament. Add some Iridescent Rhinestone Basic Jewels to the centres of the snowflakes.

TIP:

- Use a Hot Glue Gun to glue the rosette together, to adhere the snowflake topper and also to adhere the White Glittered Organdy Ribbon.

- Use Patterned Paper,  Specialty paper or Plain Vellum to create the Rosettes to create a different look.
__________________________________

I have a new tutorial bundle available this month. The December 2022 Create With Us Tutorial Bundle features 15 tutorials from Stampin' Up!® designers from around the world and this month we have all created projects that are Giftable. This is an amazing tutorial with so many fantastic ideas.


Visit my Tutorial Page HERE to purchase this bundle.
____________________

I also have a tutorial bundle available highlighting the Splendid Day Suite Collection containing 27 Tutorials from myself and demonstrators from all over the world. All tutorials contain measurements in both Imperial and Metric.


Visit my Tutorial Page HERE for more information, or visit the top of this page and click the link.
_______________________________

Subscribe to my newsletter HERE

My DECEMBER 2022 Host Code: GD9ZHCBB . When you spend over $40 in my store, you will receive a handmade card and a FREE gift from me.

If you would like to purchase any of these supplies, please click here. 

Please email me if you would like a copy of the 2022-2023 Annual Catalogue or the July-Dec 2022 Mini Catalogue.

Click to JOIN my team. 

If you would like regular updates from me, click my newsletter link here.

Follow me on social media via Facebook, Instagram and Pinterest.

Hope you are getting some crafty time today, chat soon!

Product List: 
Read more »
Annie A
0 Comments
Happy Christmas - Regal Reindeer - JAI632 Just Add Ink - Just Choose Two

Happy Christmas - Regal Reindeer - JAI632 Just Add Ink - Just Choose Two


Hello again and welcome back to my blog! I have another Just Add Ink Design Team post for you today. 

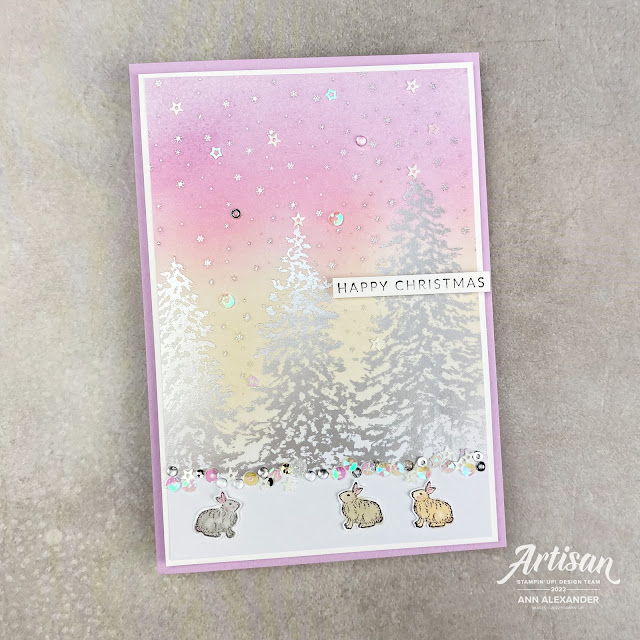
This week's challenge is the Just Add Ink #JAI632 - Just Choose Two where the choice was was between Deer, Sparkle or Trees. I decided to choose Trees and Sparkle for my card today. I used the Joyful Flurry & Regal Reindeer stamp sets. I also used the retired Peaceful Place DSP which has those beautiful foil trees. I added some ink blending to the background to add some colour and finished it off with the Sparkle & Shine Sequins Assortment. 

Click HERE if you would like to be taken straight to my store.


Instructions:

- Use a piece of Fresh Freesia A4 card cut lengthwise and folded. Layer with a piece of Basic White and then with the piece of the Peaceful Place DSP which has had Pale Papaya, Polished Pink and Fresh Freesia applied to it with a Blending Brush

- Stamp rabbits from the Regal Reindeer using Tuxedo Black ink onto Basic White. Use the Silicone Mat to stamp one bunny image on and apply the Basic White card to it to create a reverse image of the bunny. Colour the images with Stampin' Blends (Ivory/Bronze, Crumb Cake and Gray Granite) and adhere. 

- Stamp the sentiment from the Joyful Flurry stamp set onto Basic White card using Tuxedo Ink. Add Liquid Glue to the treeline border and adhere a row of Sparkle & Shine Sequins. Add some to the trees and sky to create a starry sky appearance.

______________________________________________

Will you be entering our challenge this week? We would love to see your colourful creations. Click the image below to be taken straight to this weeks challenge.

___________________________________________________________________

I have a new tutorial bundle available this month. The November 2022 Create With Us Tutorial Bundle features 15 tutorials from Stampin' Up!® designers from around the world and this month we have all created projects using Heat Embossing Techniques. 


Visit my Tutorial Page HERE to purchase this bundle.
____________________

I also have a tutorial bundle available highlighting the Splendid Day Suite Collection containing 27 Tutorials from myself and demonstrators from all over the world. All tutorials contain measurements in both Imperial and Metric.


Visit my Tutorial Page HERE for more information, or visit the top of this page and click the link.
_______________________________

Subscribe to my newsletter HERE

My DECEMBER 2022 Host Code: GD9ZHCBB . When you spend over $40 in my store, you will receive a handmade card and a FREE gift from me.

If you would like to purchase any of these supplies, please click here. 

Please email me if you would like a copy of the 2022-2023 Annual Catalogue or the July-Dec 2022 Mini Catalogue.

Click to JOIN my team. 

If you would like regular updates from me, click my newsletter link here.

Follow me on social media via Facebook, Instagram and Pinterest.

Hope you are getting some crafty time today, chat soon!

Product List: 
Read more »
Annie A
0 Comments
Happy Christmas - Joyful Flurry - Stampin' Fancy Friday

Happy Christmas - Joyful Flurry - Stampin' Fancy Friday


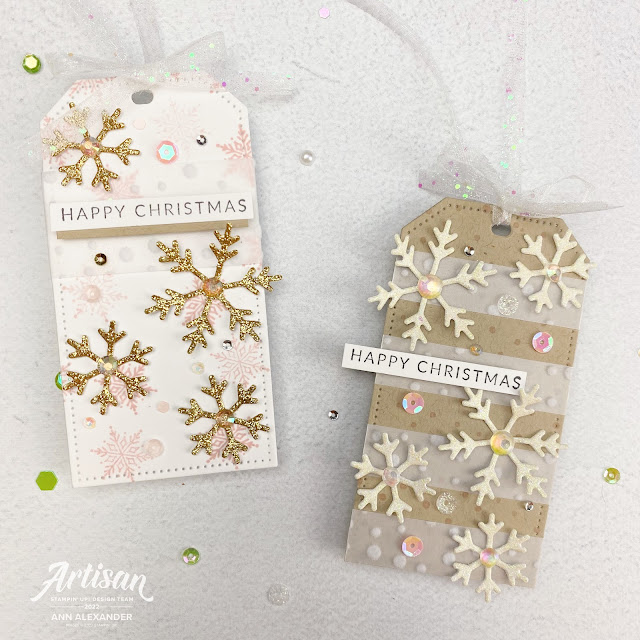
Hello and welcome back to my blog. Through the month of November, my Artisan Alumni friends and I from Stampin' Fancy Friday are joining in a Tag Fancy Challenge. We are creating a fancy tag or two to finish off any gift package. 

Visit the Stampin' Fancy Friday Instagram page HERE to see all the posts or to get inspiration and join in the challenge.

For my tags today, I used the Joyful Flurry Bundle, Snowflake Specialty Vellum, Glimmer Specialty Paper and the For Everything Fancy Sequins. 


Instructions:

- Use Basic White and Crumb Cake for the tag bases. Use the Tailor Made Tags dies to die cut two tags . Stamp small snowflakes and snow from the Joyful Flurry set using Blushing Bride ink onto the two tags. 

- Add strips of the Snowflake Specialty Vellum to the tags. Use the Frosted Flurry Dies to die cut multiple snowflakes from the Gold and Very Vanilla Glimmer Specialty Paper and adhere.

- Stamp the sentiment from the Joyful Flurry stamp set using Tuxedo Black ink onto Basic White and adhere. Add some Iridescent Rhinestone Basic Jewels to some of the snowflake centres and For Everything Fancy Sequins to the background. Finish by adding a bow using the White Glittered Organdy Ribbon.


______________________________

I have a new tutorial bundle available this month. The November 2022 Create With Us Tutorial Bundle features 15 tutorials from Stampin' Up!® designers from around the world and this month we have all created projects using Heat Embossing Techniques. 


Visit my Tutorial Page HERE to purchase this bundle.
____________________

I also have a tutorial bundle available highlighting the Splendid Day Suite Collection containing 27 Tutorials from myself and demonstrators from all over the world. All tutorials contain measurements in both Imperial and Metric.


Visit my Tutorial Page HERE for more information, or visit the top of this page and click the link.
_______________________________

Subscribe to my newsletter HERE

My NOVEMBER 2022 Host Code: 34RWU93W . When you spend over $40 in my store, you will receive a handmade card and a FREE gift from me.

If you would like to purchase any of these supplies, please click here. 

Please email me if you would like a copy of the 2022-2023 Annual Catalogue or the July-Dec 2022 Mini Catalogue.

Click to JOIN my team. 

If you would like regular updates from me, click my newsletter link here.

Follow me on social media via Facebook, Instagram and Pinterest.

Hope you are getting some crafty time today, chat soon!

Product List
Read more »
Annie A
0 Comments
I am an Independent Stampin' Up! Demonstrator