Showing posts with label Ranunculus Romance. Show all posts
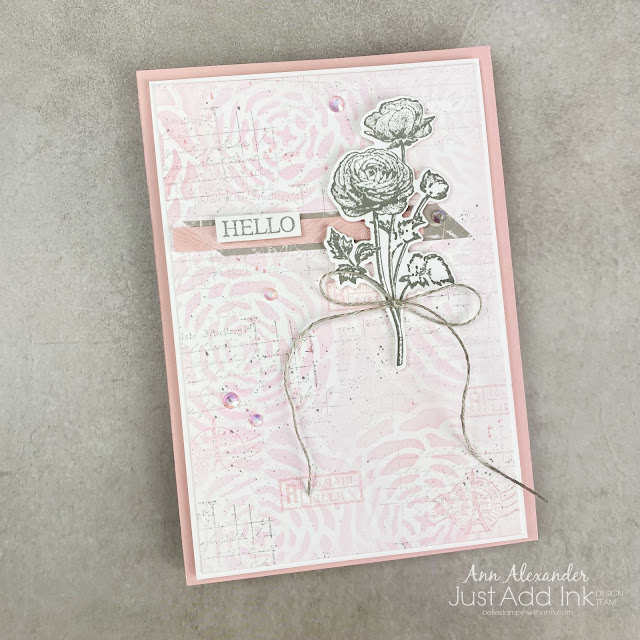
Hello - Ranunculus Romance - JAI647 Just Add Ink Sketch Challenge

Hello - Ranunculus Romance - JAI647 Just Add Ink Sketch Challenge


Hello again and welcome back to my blog! I have another Just Add Ink Design Team post for you today. This weeks challenge is the Just Add Ink #JAI647 Sketch Challenge  

So this week's sketch is actually such a versatile sketch and there is so much variety in the design team's cards this week. For my card, I wanted to use mostly retiring items from the Stampin' Up!® store. I used the Ranunculus Romance stamp set and coordinating Ranunculus Dies (retiring), Brushstoke Specialty Paper (retiring) and Sun Prints DSP (retiring). For my card layer, I used a scrap of card that I had created last year when I used this set for my Artisan team assignment. Click HERE if you would like to be taken to that project and for more details on how I created the base. 

Click HERE if you would like to be taken straight to my store if you would like to shop any of these items (while supplies last during the Last Chance sale).


Instructions:

- For the card base, use a piece of Blushing Bride A4 card cut in half lengthwise and folded. Layer with a piece of Basic White. Layer with another piece of Basic White, that has had colour added using a Blending Brush, Blushing Bride ink applied through a cardstock stencil made from the large floral from the Ranunculus Dies. Additionally it has been stamped with images from the Ranunculus Romance set using Smoky Slate and Blushing Bride inks. 

- Stamp the main floral using Gray Granite ink onto Basic White and use the dies to cut out. Use strips of the Brushstroke Specialty Paper (retiring) and Sun Prints DSP (retiring) and add a sentiment from the stamp set which has all been stamped on Basic White using Gray Granite ink. Layer this pieces onto the card and adhere the floral over the top.

- Tie a bow using Linen Thread and adhere with Liquid Glue and finally add some Iridescent Rhinestone Basic Jewels.

___________________________________________

Will you be entering our challenge this week? We would love to see your summery creation. Click the image below to be taken straight to this weeks challenge.

___________________________________________________________________

I have a tutorial bundle available this month. The March 2023 Create With Us Tutorial Bundle features 15 tutorials from Stampin' Up!® designers from around the world and this month we have all created projects that highlight the Rain or Shine Suite Collection. This is an amazing tutorial with so many fantastic ideas.

Visit my Tutorial Page HERE to purchase this bundle.
Read more »
Annie A
2 Comments
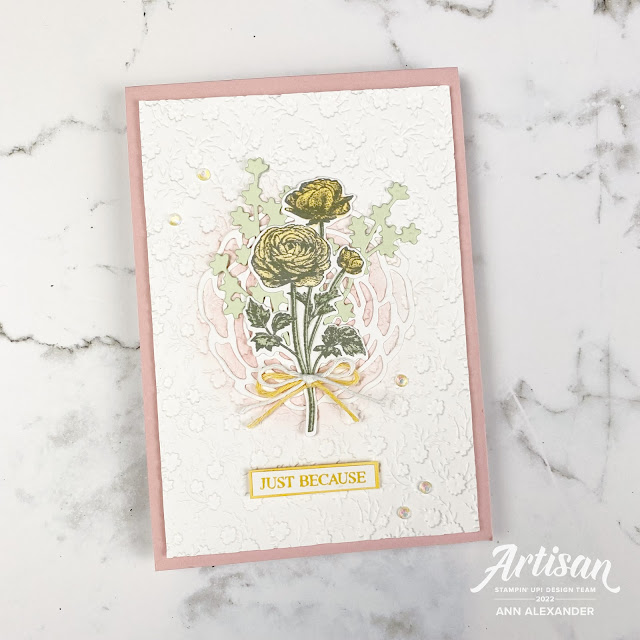
Just Because - Ranunculus Romance - GDP337 Colour Challenge

Just Because - Ranunculus Romance - GDP337 Colour Challenge


Hello and welcome to my blog! Today's card is for Global Design Project's #GDP337 Colour Challenge . This week the colours for the challenge are Soft Seafoam, Blushing Bride and So Saffron.

I used the Ranunculus Romance Bundle and the retiring Ornate Floral 3D Embossing Folder for my card. Don't forget this retiring products are only available while supplies last till the end of this month. 


Instructions:

- Use Blushing Bride A4 card cut in half lengthwise and folded for the card base. Use another piece of Basic White, apply Blushing Bride ink to the centre with a Blending Brush and emboss with the Ornate Floral Embossing Folder.

- Stamp the main floral image from the Ranunculus Romance with Smoky Slate ink onto Basic White. Colour with Stampin' Blends' - So Saffron &  Soft Seafoam. Die cut pieces from Basic White and Soft Seafoam card with the Ranunculus Dies. Adhere the floral and the die cut pieces. 

- Stamp the sentiment from the Ranunculus Romance stamp set using So Saffron ink onto Basic White card. Layer onto a strip of So Saffron card and adhere. Adhere some Iridescent Rhinestone Basic Jewels and Twine (one coloured with the So Saffron Stampin' Blends).

Read more »
Annie A
0 Comments
Artisan Design Team - March 2022 - Ranunculus Romance

Artisan Design Team - March 2022 - Ranunculus Romance


Hello and welcome to my blog! Today I am sharing my March monthly showcase projects for the Stampin' Up!® Artisan Design Team! 

For this month's projects, I was asked to use products from the beautiful Ranunculus Romance Bundle (from the Stampin' Up!® January-June 2022 Mini Catalogue). I hope that the projects I have made inspire you to create something using this lovely bundle! Don't forget to visit the Stampin' Up!® Corporate Facebook Page to see what the other Artisan Team Members have created with this set.


Here is the full bundle with the Ranunculus Romance Cling Stamp Set and Ranunculus Dies.


Hello


- Use Smoky Slate card for the base, with Basic White for the layer. Use a piece of Basic White and stamp multiple images from the Ranunculus Romance set with Smoky Slate ink using second generation stamping. Blend Blushing Bride ink onto the edges with a Blending Brush. Die cut two large ranunculus dies from Basic White card. Use one to apply Shimmery White Embossing Paste through with a palette knife, to create dimension to the card. Use Blushing Bride ink and apply to the second die cut using a Blending Brush. Tie a piece of Gold Simply Elegant Trim around the card.

- Stamp the flower from the Ranunculus Romance stamp set using Versamark ink onto Basic White card and heat emboss with Gold Stampin' Emboss Powder and die cut using the Ranunculus Dies. Stamp some of the leaves using Highland Heather and die cut. Additionally die cut some further leaves/branches and apply Mint Macaron ink with a Blending Brush. Layer these pieces and adhere to the large die cut and adhere to the card. Tie a couple of bows using Gold Simply Elegant trim and adhere to the florals. 

- Stamp a sentiment from the Ranunculus Romance set onto Basic White card using Smoky Slate ink and mat onto a piece of Gold Metallic Specialty Paper. Adhere the sentiment and over the top of the Gold Trim. Use some Iridescent Rhinestone Basic Jewels to finish the card.


TIP:  The Ranunculus Romance Bundle lends itself to both vintage and modern projects. Add more details and texture to your projects by using the large ranunculus die in different ways. As well as using the die cut as an embellishment on your card, you can also use it as a stencil with Shimmery White Embossing Paste to add sparkly, textured but easy dimension to your card.

Just Because


-  Use a Basic Gray card base, and a layer of So Saffron. Use a piece of Basic White and apply So Saffron ink with a Blending Brush then emboss with the Timeworn Type Embossing Folder. Splatter with So Saffron ink.

- Use a piece of Basic White die cut the large floral images from the Ranunculus Dies set and adhere to the card. Die cut multiple leaves using Vellum using the Ranunculus Dies. Colour the back lightly with So Saffron Stampin' Blends and adhere over the top of the large die cut. 

- Stamp the flower from the Ranunculus Romance stamp set using Versamark ink onto Basic White card and heat emboss with Gold Stampin' Emboss Powder and die cut using the Ranunculus Dies. Adhere to the other die cuts and then attach Gold Shimmer Ribbon knotted together .

- Stamp a sentiment from the Ranunculus Romance stamp set using Smoky Slate ink on to Basic White and mat with strips of Basic White card stamped with So Saffron and Basic Gray Ink. Layer and then adhere the pieces onto a strip of Gold Shimmer Ribbon and then onto the card. Add some Iridescent Rhinestone Basic Jewels.

** Email me if you have any questions.

Don't forget to subscribe to my newsletter.

Also don't forget to visit my Tutorial page for my brand new August-September 2021 Sale-a-bration Mega Tutorial Bundle which contains 39 tutorials. Even though Sale-a-bration has finished, there are so many inspiring tutorials in the bundle.I also have the Dandy Garden Mega Tutorial Bundle which contains 62 tutorials for Dragonfly and Dandy Garden inspiration from Demonstrators all over the world and the  Love You Always - Mosaic Card Tutorial available as a tutorial too. 

Read more »
Annie A
0 Comments
I am an Independent Stampin' Up! Demonstrator