Showing posts with label Bright & Beautiful. Show all posts
Yay You - Cutest Cows - GDP431 Theme Challenge

Yay You - Cutest Cows - GDP431 Theme Challenge


Hello and welcome back to my blog! Today's card is for Global Design Project's GDP431 Theme Challenge. This week we have a fun theme challenge involving 'Balloons'.

There are actually quite a few sets that could work for this theme, but I decide to use the Cutest Cows stamp set and combined with the Bright & Beautiful Memories & More Card Pack & Cards & Envelopes and Zoo Crew DSP to create my fun card today. I used a Black Stampin' Write Marker to create texture for the grass and the strings for the balloons.


Instructions:

- Use a card from the Bright & Beautiful Memories & More Cards & Envelopes for the card base.

- Stamp the cow and birds from the Cutest Cows onto Zoo Crew DSP (cow) and Basic White card (cow's head and birds) using Tuxedo Black ink. Colour with Stampin' Blends ( Smoky Slate, Lost Lagoon, Pumpkin Pie, Lemon Lolly, Cajun Craze, Real Red and Lost Lagoon. 

- Stamp grass using the Cutest Cows set with Tuxedo Black onto the card base. Add some details to the grass and add strings to the balloons using a Black Stampin' Write Marker. Also use the marker to colour in the large black spots on the cow's body. Adhere all the stamped elements to the card. 

- Add some balloon and star stickers from the Bright & Beautiful Memories & More Card Pack including one with the sentiment onto it.

_____________________________

My FEBRUARY 2024 Host Code: XFGSK9GZ . When you spend over $40 in my store, you will receive a handmade card and a FREE gift from me.

If you would like to purchase any of these supplies, please click here. 

Please email me if you would like a copy of the 2023-2024 Annual Catalogue or the September - December 2023 Mini Catalogue, or the Jan-April 2024 Mini and Sale-a-bration Catalogues.

Follow me on social media via Facebook, Instagram and Pinterest.

Hope you are getting some crafty time today, chat soon! 
Read more »
Annie A
0 Comments
Thanks - Medley Mix - GDP415 Theme Challenge

Thanks - Medley Mix - GDP415 Theme Challenge


Hello and welcome back to my blog! Today's card is for Global Design Project's GDP415 Theme Challenge .

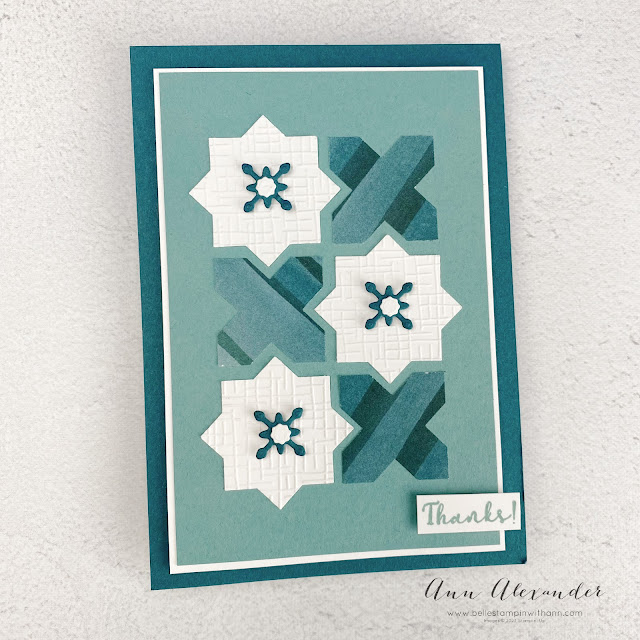
I used the Medley Mix stamp set, Bright & Beautiful DSP, Inked & Tiled Punch Pack, Cross Hatch Basics Embossing Folder and Paper Florist Dies. 

Instructions:

- Use Pretty Peacock for the card base. Layer with Basic White card and a piece of Lost Lagoon DSP.

- Use the Inked & Tiled Punch Pack to punch out pieces from Basic White card and the Bright & Beautiful DSP. Emboss the Basic White card pieces with the Cross Hatch Basics Embossing Folder. Adhere all the punched pieces to the card.

- Use the Paper Florist Dies to cut pieces from Pretty Peacock and Basic White card and layer and adhere to the Basic White punched pieces.

- Stamp the sentiment from the Medley Mix set with Lost Lagoon ink onto Basic White and adhere.

_____________________________

My OCTOBER 2023 Host Code: MVCSDJRC . When you spend over $40 in my store, you will receive a handmade card and a FREE gift from me.

If you would like to purchase any of these supplies, please click here. 

Please email me if you would like a copy of the 2023-2024 Annual Catalogue or the September - December 2023 Mini Catalogue.

Click to JOIN my team. 

Follow me on social media via Facebook, Instagram and Pinterest.

Hope you are getting some crafty time today, chat soon! 
Read more »
Annie A
0 Comments
Way To Go - Zany Zoo & Bright & Beautiful - CAS on Friday

Way To Go - Zany Zoo & Bright & Beautiful - CAS on Friday


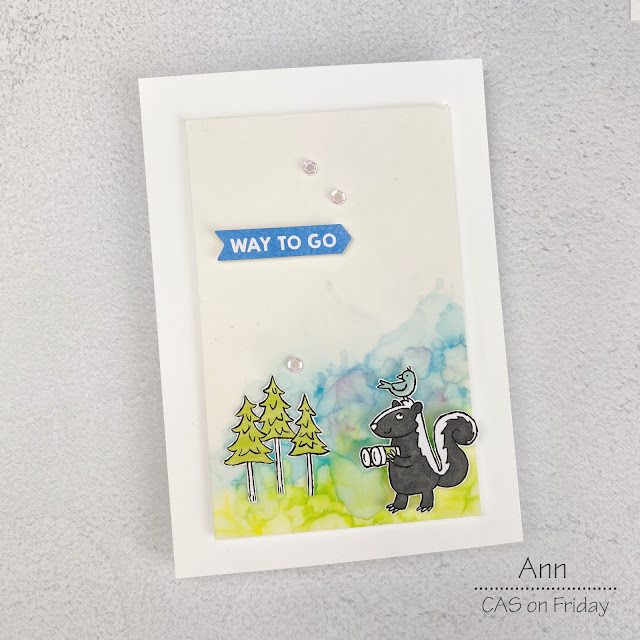
Hello and welcome back to my blog! My card for today is for this week's CAS on Friday Challenge #263 theme which is "Holidays". 

I don't have any specific holiday sets, but I am still loving the Zany Zoo stamp and Zoo Crew DSP. I used one of the images from the Zoo Crew DSP, Stampin' Blends to create the background and a sentiment from the Bright & Beautiful Memories and More Card Pack. I also added some Pastel Adhesive Backed Sequins.

Make sure to visit the blog HERE to see the rest of the team's projects.

Instructions:

- Use Basic White for the card base. Use a piece of Vellum, Stampin' Blends (Parakeet Party, Tahitian Tide and Azure Afternoon). Isopropyl Alcohol and an air blower and create the background piece. Adhere to a piece of Basic White using an Adhesive Sheet and attach to the card base.

- Fussy cut the skunk and trees from the Zoo Crew DSP and adhere. Cut a sentiment from the Bright & Beautiful Memories and More Card Pack and finally add some Pastel Adhesive Backed Sequins.

_______________________________

I have a tutorial bundle available. This Create With Us Tutorial Bundle features 15 tutorials from Stampin' Up!® designers from around the world and this month we have all created projects that highlight the Rain or Shine Suite Collection. This is an amazing tutorial with so many fantastic ideas.
Visit my Tutorial Page HERE to purchase this bundle or various others I have available.
Read more »
Annie A
2 Comments
It's Your Birthday/ You & Me - It's A Science

It's Your Birthday/ You & Me - It's A Science


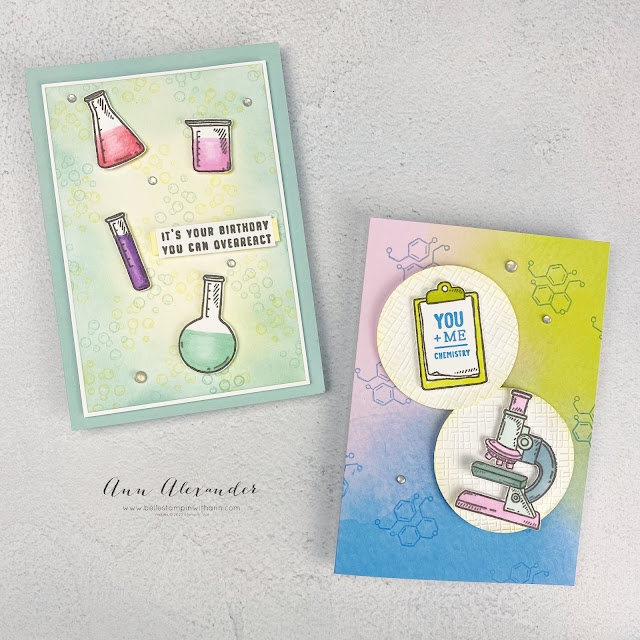
Hello and welcome back to my blog! I am sharing a couple of cards I created using the very fun 'It's A Science' stamp set. 

Card 1 Instructions:

- Use Pool Party card for the base and layer with a piece of Basic White. Use another piece of Basic White and stamp bubbles from the It's A Science set using both Lemon Lolly and Pool Party ink. Use a Blending Brush to apply the same colours of ink to the edges of the card. 

- Use Pebbled Path ink to stamp the images and sentiment onto Basic White. Fussy cut the images and colour with Stampin' Blends (Flirty Flamingo, Bubble Bath, Fresh Freesia, Highland Heather & Pool Party) and add to the card. Add some Adhesive Backed Milky Dots (retired) to complete.

Card 2 Instructions:

- Use a card from the Bright & Beautiful Memories & More Cards & Envelope Pack cut down to size for the card base. Stamp images from the It's A Science set using Azure Afternoon ink and second generation stamping.  

- Stamp the main images from the It's A Science set using Pebbled Path ink onto Basic White card and fussy cut. Stamp the sentiment from the set into the centre of the clipboard using Azure Afternoon ink. Colour the images with Stampin' Blends (Lemon Lime Twist, Bubble Bath, Pool Party, Balmy Blue and Lost Lagoon). 

- Use the 2 3/8" Circle Punch to punch circles from Basic White card and emboss with the Cross Hatch Basics Embossing Folder. Apply Lemon Lolly ink with a Blending Brush to the edges of the punched circles and then add the images to the card. Add some Adhesive Backed Milky Dots (retired) to complete.

_____________________________

I have a tutorial bundle available. This Create With Us Tutorial Bundle features 15 tutorials from Stampin' Up!® designers from around the world and this month we have all created projects that highlight the Rain or Shine Suite Collection. This is an amazing tutorial with so many fantastic ideas.

Visit my Tutorial Page HERE to purchase this bundle or various others I have available.
Read more »
Annie A
0 Comments
I am an Independent Stampin' Up! Demonstrator