Showing posts with label Art In Bloom. Show all posts
Dear Friend - Art In Bloom - Inspire and Create with Stampin' Up!®

Dear Friend - Art In Bloom - Inspire and Create with Stampin' Up!®


Hello and welcome back! So today's post is for the Inspire and Create with Stampin' Up!® team which is a brand new group of Stampin' Up!® demonstrators sharing our creations every 2 weeks highlighting different techniques and themes.

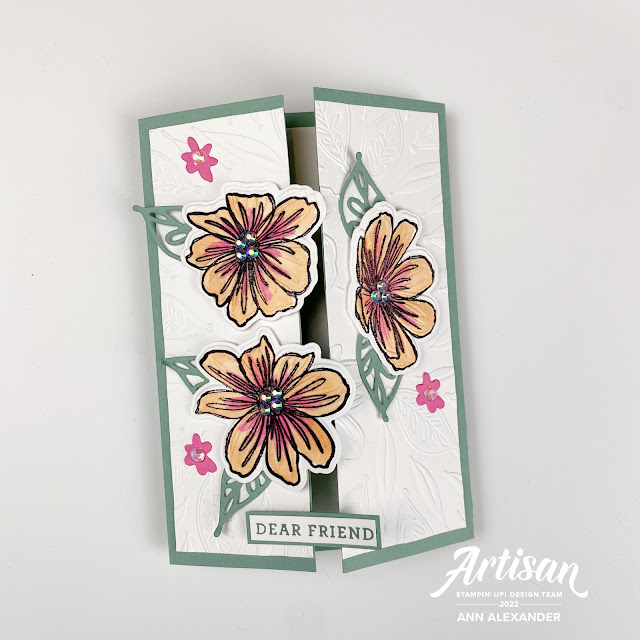
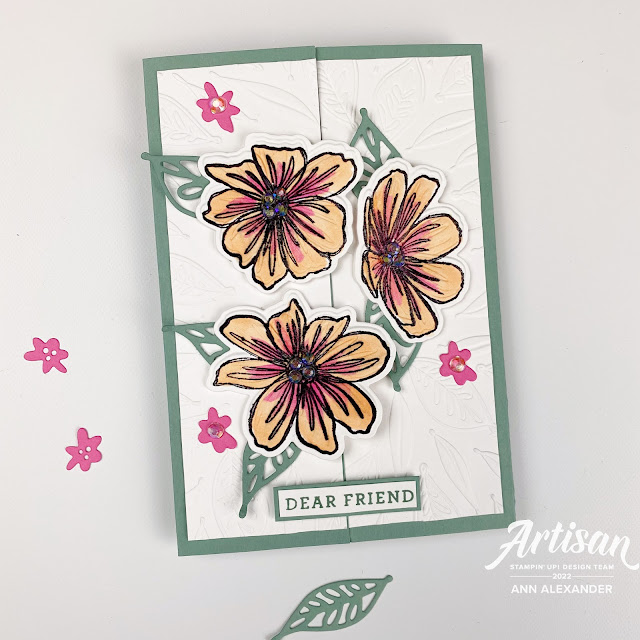
Today's theme was a Fun Fold. I don't often do fun folds, so I decided to keep it quite simple for my card today. I created a gatefold card using the Art in Bloom Bundle and attached the flowers to go over the opening to create more continuity.


Instructions:
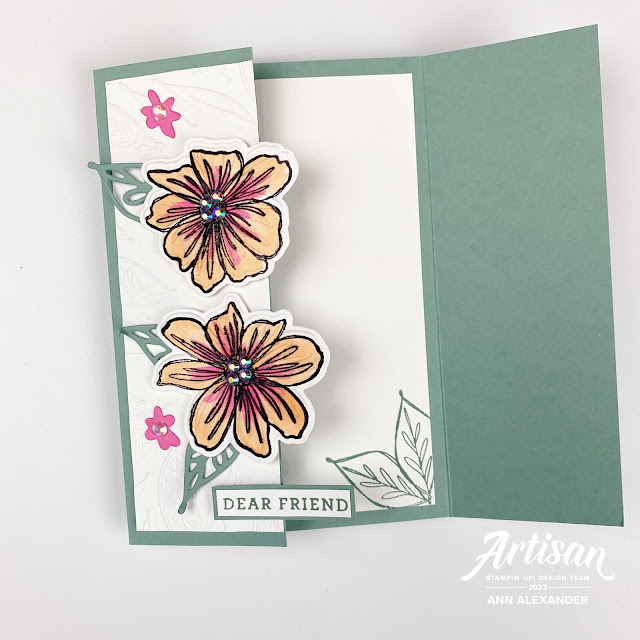
- Use Soft Succulent A4 card cut half and folded to create the gatefold for the card base. Use a piece of Basic White card which has been embossed with the Bloom Hybrid Embossing Folder, cut in half and then adhered to the card front.

- Stamp the flowers from the Art in Bloom Stamp Set with Tuxedo Black ink. Colour the flowers with Pale Papaya and Polished Pink Stampin' Blends. Use the Bloom Dies and then the Bloom Hybrid Embossing Folder to both die cut and emboss the flowers. Die cut flowers and leaves using the Bloom Dies from Soft Succulent and Polished Pink card. Adhere to the card.

- Stamp the sentiment from the Art in Bloom stamp set onto Basic White using Soft Succulent ink. Attach this to a strip of Soft Succulent card and adhere to one side of the gatefold. Add some Iridescent Rhinestone Basic Jewels to the centres of the flowers. Use a piece of Basic White on the inside of the card which has been stamped with the leaves from the Art in Bloom set.


You are currently visiting Ann Alexander. Please see the list below and hop through all of the people on the list to see all our "Fun Fold" projects. There is so much inspiration, you won't want to miss any of the other projects! 

BLOG LINKS:


** Please email me if you have any questions.

Don't forget to subscribe to my newsletter.

Also don't forget to visit my Tutorial page for my brand new August-September 2021 Sale-a-bration Mega Tutorial Bundle which contains 39 tutorials. Even though Sale-a-bration has finished, there are so many inspiring tutorials in the bundle.I also have the Dandy Garden Mega Tutorial Bundle which contains 62 tutorials for Dragonfly and Dandy Garden inspiration from Demonstrators all over the world and the  Love You Always - Mosaic Card Tutorial available as a tutorial too. 

Read more »
Annie A
2 Comments
Thanks - Art in Bloom & Pattern Party DSP - Demonstrator Training Program - Monthly Blog Hop October 2021

Thanks - Art in Bloom & Pattern Party DSP - Demonstrator Training Program - Monthly Blog Hop October 2021


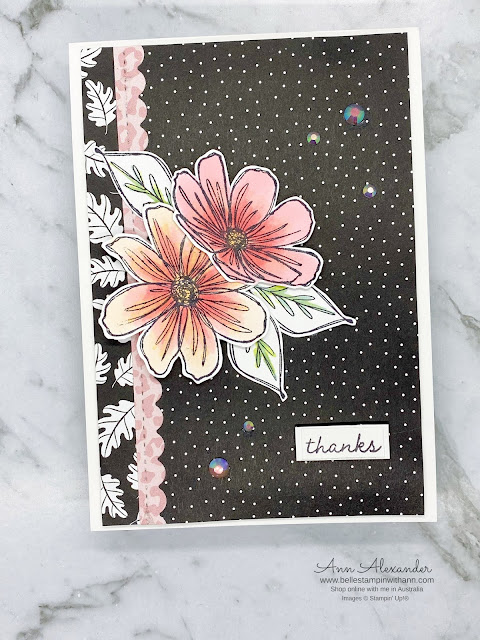
My card for today is for Kylie Bertucci's Demonstrator Training Program Blog Hop October 2021. I am so happy that you could join my fellow demonstrators and I today for this blog hop, which I hope will provide you with many ideas and creative inspiration. The theme is "Thank You".

We are a group of Stampin' Up!® Demonstrators from around the world that are taking part in training that is helping us to build a successful Stampin' Up!® business and reach some goals we have set. We really appreciate your support!

You may be starting here or may have come from another blog - either way you can find the link list at the bottom of this post so that you can see every blog post and idea today.

Today I used the Art in Bloom Stamp set and combined it with the Pattern Party DSP (a Host Rewards item), Penned Flowers Dies, Stampin' Blends and the From My Heart Faceted Gems.


Instructions:

Use a piece of Basic White for the card base. Use a couple of pieces of coordinating Pattern Party DSP and attach the slightly smaller piece to the larger one with Liquid Glue allowing there to be a strip of patterned paper visible. Use the Penned Flowers Dies to die cut another piece of the Pattern Party DSP and adhere with Liquid Glue over the join of the two previous papers. Attach them to the card base with a Foam Adhesive Sheet. 
 
Stamp the Art in Bloom floral and leaves stamp with Tuxedo Black onto Basic White card. Fussy cut the images (these can be die cut with the coordinating dies). Colour the images with Stampin' Blends (listed below).

Stamp the sentiment from the Art in Bloom stamp set onto a strip of Basic White card. Cut the sentiment so that only the "Thanks" sentiment is being used. Adhere this onto a slightly larger strip of Basic White card then attach to the card using Stampin' Dimensionals. Add some From My Heart Faceted Gems to the front of the card.


Measurements:

- Basic White card base A4/Letter cut in half lengthwise and folded.

- Pattern Party DSP (total width of the two pieces of DSP): A4 5 5/8" x 3 7/8"/ 14.4 cm x 10 cm or Letter 4" x 5 1/4"

Thanks so much for stopping by today!

As I mentioned at the top, this is a blog hop so make sure you 'hop' around to all the amazing projects from my fellow demonstrators on this hop! Click on the links below to visit them.

Do you need any of the products used on todays project? Scroll down to the bottom of this post to find the products and click on the shopping links below and add them to your collection now. 

BLOG LINKS: 

** Please email me if you have any questions.

Also don't forget to visit my Tutorial page for my brand new August-September 2021 Sale-a-bration Mega Tutorial Bundle which contains 39 tutorials. Even though Sale-a-bration has finished, there are so many inspiring tutorials in the bundle.I also have the Dandy Garden Mega Tutorial Bundle which contains 62 tutorials for Dragonfly and Dandy Garden inspiration from Demonstrators all over the world and the  Love You Always - Mosaic Card Tutorial available as a tutorial too. 

Read more »
Annie A
28 Comments
Never not loving you - Seasonal Labels Dies, Intricate Labels Dies & Art in Bloom Stamp Set - #TGIFC331

Never not loving you - Seasonal Labels Dies, Intricate Labels Dies & Art in Bloom Stamp Set - #TGIFC331


Hello again! Today's card is one I made using a whole lot of different sets. I entered this card into this weeks TGIF Challenges Inspiration Challenge #TGIFC331 which was "Walk on the Wild side".

Now this weeks card is a last minute entry after a hectic week, so I do have to apologise for only getting one photo of this card. The leaves and branches were my main element to correlate with the challenge, but they almost remind me of a deer and its antlers which I think adds to the effect.

I used the new Seasonal Labels and Intricate Leaves Dies (from the Aug-Dec Mini Catalogue), as well as the Art in Bloom stamp set, Expressions in Ink Specialty DSP and the Timeworn Type 3D Embossing Folder.

(**Please note that it is the Intricate Leaves not Labels dies as in the title of the post. I have not amended the title as I did not want to affect the permalink for this post.**)


Instructions:

- Use a piece of Basic White A4 card, cut in half lengthwise and folded. Use another piece of Basic White card and emboss with the Timeworn Type Embossing Folder. Attach this piece to the card base using Stampin' Dimensionals.

- Using the Seasonal Labels Dies, die cut some leaves from the Expressions in Ink DSP. Additionally cut some branches from Early Espresso card using the Intricate Leaves Dies. Arrange the die cuts on the card front and attach using Liquid Glue. Tie two bows using the Gold Simply Elegant Twine and attach to the leaves using a Mini Glue Dot.

- Stamp a sentiment from the Art in Bloom stamp set using Versamark ink onto Basic Black card, heat emboss with White Stampin' Emboss Powder and then attach to the card using Stampin' Dimensionals. Finally add some Matte Black Dots to add some visual interest.


Don't forget to subscribe to my newsletter as I will have dimensions for this card. 

Don't forget to visit my Tutorial page for the Dandy Garden Mega Tutorial Bundle which contains 62 tutorials for Dragonfly and Dandy Garden inspiration from Demonstrators all over the world. I also have my Love You Always - Mosaic Card Tutorial available as a tutorial too.
Read more »
Annie A
2 Comments
Never Not Loving You - Art In Bloom - Ink and Inspiration Blog Hop June 2021

Never Not Loving You - Art In Bloom - Ink and Inspiration Blog Hop June 2021


Hello and welcome back to my blog. You are visiting Ann Alexander from Australia. Today I have a card for the "Ink and Inspiration Blog Hop". Our theme this month is "Let Your Colours Shine" which involves highlighting one or more colours from Stampin' Up!®. I decided to highlight the new 2021-2023 In Colour Polished Pink which is so pretty and bright. I went for an ombré look to show off this gorgeous colour.


Instructions:

- Use a piece of Thick Basic White card A4/Letter cut in half lengthwise and folded. 

- Use a smaller piece of Thick Basic White and adhere a Polished Pink Ombré Gift Bag that you have cut down to size using Liquid Glue. Stamp various images from the Art In Bloom stamp set using Polished Pink onto the Ombre Gift Bag. Attach this layer to the card base using Stampin' Dimensionals. 

- Stamp the Art in Bloom large floral images onto Vellum with Versamark and then heat emboss with White Stampin' Emboss Powder. Use the coordinating dies to die cut the stamped images as well as more flowers and leaves using Vellum and Basic White card. 

- Use Blending brushes to add a touch of Polished Pink ink to the small die cut white flowers. Use Stampin' Blends to add some Polished Pink to the large flowers, and Soft Succulent to the die cut leaves.

- Stamp the sentiment from the Art in Bloom stamp set using Versamark ink onto a small strip of Basic Black and heat emboss with White Stampin' Emboss Powder.  Attach the sentiment to the card using Stampin' Dimensionals.

- Use some 2021-2023 In Colour Jewels and Silver & Clear Epoxy Essentials to add some sparkle to the card.

Measurements:

- Basic White Thick Card base A4/Letter cut in half lengthwise and folded

- Basic White Thick Card/Ombré Bag: A4 5 1/2" x 3 3/4"/ 14.2 x 9.8 cm or Letter 3 7/8" x 5 1/8"

I hope the card you've seen here on my blog today has inspired you to create something with this suite. You are currently visiting Ann Alexander. Please see the list below and hop through all of the people on the list to see all our projects. There is so much inspiration, you won't want to miss any of the other projects! 

BLOG LINKS:


*** Email me if you have any questions about this card. 

Don't forget to subscribe to my newsletter! 

Don't forget to visit my Tutorial page for the Dandy Garden Mega Tutorial Bundle which contains 62 tutorials for Dragonfly and Dandy Garden inspiration from Demonstrators all over the world. I also have my Love You Always - Mosaic Card Tutorial available as a tutorial too.
Read more »
Annie A
16 Comments
I am an Independent Stampin' Up! Demonstrator