Showing posts with label Expressions in Ink. Show all posts
Happy Birthday - Butterfly Brilliance

Happy Birthday - Butterfly Brilliance


Hello and welcome back! I have a card I made for The Crafty Carrot Collective 5th Birthday Bash Mystery Stamping Challenge. The stamping challenge required the colour Orange, Vellum, a Birthday sentiment and Ribbon/Twine

I decided to use some of the some of the products from the Annual Catalogue including the Brilliant Wings Dies, Expressions in Ink DSP and Shaded Summer stamp set. I also added in the Vellum Layering Designs from the Jan-June 2022 Mini Catalogue and the Tasteful Textile Embossing Folder

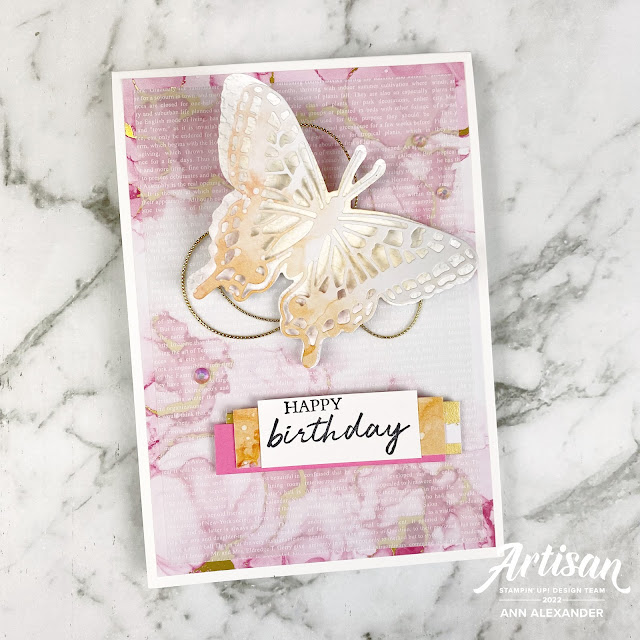
For my card, I used the Pale Papaya from the Expressions in Ink DSP for my 'Orange', the Vellum Layering Designs for my Vellum, the birthday sentiment from the Shaded Summer set and the Gold Simply Elegant Trim for my 'twine'.

Instructions:

- Use Basic White A4 card cut lengthwise and folded for the card base. Layer with a piece of Expressions in Ink DSP and then a piece of Vellum Layering Designs.

- Die cut a piece of the Expressions in Ink DSP with the Brilliant Wings Dies and then a solid butterfly from Basic White card. Emboss the solid butterfly shape with the Tasteful Textiles Embossing Folder. Adhere the butterflies together and then adhere over some twisted Gold Simply Elegant Trim onto the card.

- Stamp the sentiment from the Shaded Summer stamp set using Tuxedo Black ink onto Basic White card. Adhere onto some strips of Expressions in Ink DSP and Polished Pink card and attach to the card. Embellsh with some Iridescent Rhinestone Basic Jewels.


Read more »
Annie A
0 Comments
Hello - Biggest Wish (Expressions in Ink DSP & Floral Heart Dies)

Hello - Biggest Wish (Expressions in Ink DSP & Floral Heart Dies)


Hello again! This week Stampin' Through the Catalog is highlighting the Biggest Wish stamp set. This set is such an versatile one with sentiments in upper and lower cases that can be mixed and matched.

In addition to using the Biggest Wishes stamp set, I used the Expressions in Ink Designer Series Paper and Floral Heart Dies from Stampin' Up!®.

Instructions:

- Use a piece of Pale Papaya card A4 cut in half lengthwise and folded. Use a smaller piece of gold striped Expressions in Ink DSP and adhere to the card base using Liquid Glue. Attach a piece of Basic White card to the card base using Stampin' Dimensionals. 

- Use the Floral Heart Dies and die cut the heart from the Expressions in Ink DSP. Adhere to the Basic White card using Liquid Glue. 

- Die cut small hearts from the DSP using the Floral Heart Dies and attach to the card front using Liquid Glue. 

- Add some Polished Pink and Pale Papaya 2021-2023 In Colour Jewels to the front of the card.

Don't forget to subscribe to my newsletter as I will have dimensions for this card. 

Don't forget to visit my Tutorial page for the Dandy Garden Mega Tutorial Bundle which contains 62 tutorials for Dragonfly and Dandy Garden inspiration from Demonstrators all over the world. I also have my Love You Always - Mosaic Card Tutorial available as a tutorial too.

Read more »
Annie A
0 Comments
Congratulations - Expressions in Ink Suite - Ink and Inspiration Blog Hop May 2021

Congratulations - Expressions in Ink Suite - Ink and Inspiration Blog Hop May 2021


Hello and welcome back to my blog. You are visiting Ann Alexander from Australia. Today I have a card for the "Ink and Inspiration Blog Hop". Our theme this month is "Sweet Suite" which involves highlighting one of the current suites available from Stampin' Up!®. I decided to highlight the new Expressions in Ink Suite which is so pretty and colourful and who can resist the pops of gold? I decided instead of picking the pinks, to highlight the dark greens and gold in the suite.


Instructions:

- Use a piece of Evening Evergreen card A4/Letter cut in half lengthwise and folded. Use one of the leaf stamps (the two leaves) from the Artistically Inked Stamp Set and stamp over the Evergreen card using Evening Evergreen ink.

- Use a smaller piece of Basic White and attach to the card base using Stampin' Dimensionals. Use a piece of the Expressions In Ink Designer Series Paper and adhere to the Basic White layer using Liquid Glue.

- Use the Artistic Dies to die cut the floral image from Vellum. Colour the die cut with Wink of Stella. Attach to the DSP layer using sponged Liquid Glue.

- Stamp the sentiment from the Artistically Inked stamp set using Evening Evergreen ink onto a small strip of Basic White card then attach to the card base using Stampin' Dimensionals.

- Use some Holiday Rhinestone Basic Jewels on the floral die cut and the card.

- Use a piece of Basic White cardstock on the interior of the card, and add a strip of the Expressions Ink Ink DSP to it to add a decorative element.

Measurements:

- Evening Evergreen base A4/Letter cut in half lengthwise and folded

- Basic White: A4 5" x 3 1/4"/ 13.1 x 8.7 cm or Letter 3 3/8" x 4 5/8"

- Expressions In Ink DSP: A4 4 3/4" x 3"/ 12.1 x 7.7 cm or Letter 3 1/8" x 4 3/8"

I hope the card you've seen here on my blog today has inspired you to create something with this suite. You are currently visiting Ann Alexander. Please see the list below and hop through all of the people on the list to see all our projects. There is so much inspiration, you won't want to miss any of the other projects!


BLOG LINKS:

** Please email me if you have any questions.

Don't forget to visit my Tutorial page for the Dandy Garden Mega Tutorial Bundle which contains 62 tutorials for Dragonfly and Dandy Garden inspiration. I also have my Love You Always - Mosaic Card Tutorial available as a tutorial too.
Read more »
Annie A
19 Comments
I am an Independent Stampin' Up! Demonstrator